
When there’s limited support or resources for user-centred design, sketching is a way to overcome organisational barriers by involving non-designers in the design process for software and content systems. The Five Sketches™ design method is a structured approach to group sketching that lets people who aren’t designers contribute to solutions, despite a lack of experience or training in design methods. Five Sketches™ works well for any of these goals or constraints:
- you are in a hurry.
- you have too few user-experience researchers for discovery research, or too few designers.
- you want your team to collaborate better—the Lean UX way—instead of developing (or coding) the feature without designing it.
- you’d like your Agile developers to contribute to the design by not coding for a day-and-a-half and instead joining you in Design Up Front for iteration zero.
- you want your team to embrace iteration and to welcome feedback about usability and user experience—including from early customer validation.
- you want lower development costs.
- you want to solve user problems rather than develop a technically “cool” feature or solution.
- You want your team to understand the product they’ll be building.
- you want your team to quickly deliver light designs over heavy wireframes, composites, or specifications.
If you don’t have at least a few of these goals or constraints, then by all means choose a different design method. Or if you have reservations about design up front, take a few minutes to read What’s wrong with Big Design Up Front? (There’s nothing wrong with it, even for an Agile or Lean team.)
Skip to the table of contents if you’re looking for a specific Five Sketches™ method topic.

First, some guiding principles
There are three guidelines that quickly lead to better solutions, when using the Five Sketches™ method.
Start with many, many ideas
When people have only one idea—one design—they hold onto it tightly and they start to build it. Then, when that one idea shows a weakness, they bolt on another idea to fix it. Repeat that a few times and you get an inelegant, hard-to-use solution.
On the other hand, when people have lots of ideas, they’re less likely to hang onto any particular one of them. When people practice generating many ideas, they soon realize that generating ideas is cheap. Coding and testing is much more expensive than spending a few hours thinking and sketching on paper. Generating lots of ideas makes it easier to combine and evolve the best parts into a quality software design.
The best way we’ve found to generate lots of ideas is to involve multiple people, and to work quickly.
Use three or four participants
Practice has taught us that two participants is too few and five is too many. The target of three to four participants is mainly about time, because each additional person generates at least eight sketches that need to be presented and critiqued.
No sketching skills or artistic abilities are required. You can choose participants from your Development, Product, and QA teams, and also one person from your marketing or administration teams.
Success tip: Try to include some of the developers who will build the software.
Each participant must be present for the entire process, which takes a half-day of interruption-free commitment. If participants are pulled away for short periods, the process risks failure because some participants will miss key information. For this reason, managers can make poor participants—they’re often pulled away. Managers, however, play an important role in prioritizing and making people available, so your participants can commit to the entire process.
As facilitator, you yourself must not sketch, because the group tends to defer to the facilitator’s ideas. But you won’t be bored. You’ll be busy guiding the process.
Follow the structured process
The Five Sketches™ method was developed through trial and error. We collectively worked through the friction and the frustration, and we didn’t give up—because we had a real problem to solve. With insufficient UX resources, it was essential for us to find a way to compensate. After each attempt at a workable process, our participants were debriefed separately and all their concerns were channelled back to the group. Together we found ways to improve the process so it works. And not only does it generate quality designs, we discovered it also has team-building benefits. Every step in the Five Sketches™ method has a purpose.
So, before you try adjusting the process to suit your team, we recommend you closely follow the ten steps described below, at least once.
Success tip: To benefit from our hard-learned lessons, try the recommended process as is, before you adapt it.

Here’s the process in 10 detailed steps
1. Kick-off meeting and scheduling sessions
You’ll need up to 55 minutes.
- Share the facts with the team, in the first 25 minutes. If you have them, review the user personas, the market requirements, and the competitors’ products. Invite a subject-matter expert to share 5 quick points about industry concepts and jargon. Invite your team’s user researcher to tell you about the target audience, or users. Invite the product manager to say five sentences about the company’s business goals and product strategy. Review any requirements the business analyst has written about customers and regulators. Decide how the team will get any additional information that’s needed.
- Discuss and set the problem statement, in the next 10 minutes. Typically, the problem statement is about a common task that the target audience—the users—need to accomplish. Once you have a problem statement, check that it is a single problem that describes the user’s goal without describing a solution. If you’ve never done this, read about getting the problem statement just right.
- Agree on what a sketch is, in the third 15 minutes, if the group has never sketched. Make sure you’ve brought sketching supplies, and then teach the participants how to communicate effectively with sketches to help them succeed.
- Book a four-hour design session, in the remaining few minutes. Four hours seems a lot, but it’s often barely enough. Collectively you’ll be presenting dozens of sketches, producing a dozen more, assessing and critiquing their merits, and then responding to the critique. Many participants have observed that the best solutions come in the last hour, when people have tired of analyzing and instead let their brains generate ideas more freely, using the first three hours of idea sharing as subconscious input. And remember: a few hours of sketching is cheaper—and easier—than coding, testing, and then discovering that you must discard your work because you built the wrong thing.
Success tip: You’ll be tempted to schedule shorter sessions—to save a half hour or even an hour—but give yourselves the full four hours to succeed.
If you have multiple problem statements, schedule one four-hour session for each problem statement, plus one extra session that, if not needed, you can release. Schedule ahead, because it’s impossible to book 4-hour sessions on short notice that all can attend.
Success tip: Always book one more four-hour session than you think you’ll need.
If you’re having trouble finding slots that all participants can attend together, ask a manager to help participants to prioritise the Five Sketches™ sessions.

2. Individual homework: Sketch five different ideas
Ask each user to sketch five substantially different ideas. If it’s their first time, five will seem like a lot. The team hasn’t yet learned that there are always at least five ideas in response to each problem statement.
Why five? The success of this method depends on filling the space with ideas, so they can be mashed up and iterated. It also enables participants to let go of their ideas, since they learn that they can have more ideas, if needed. Early on, before we shortened it to Five Sketches™, we named the process Five Sketches Or Else We Fail, to drive that point home. If you’re having doubts, read Why 5 sketches? Why not 3?
While sketching, participants will run aground—the sticking point—often after the second or third idea. Prepare your participants for this. Tell them they’ll have to take breaks, and that they may need to spend time looking for inspiration. Sketching as a problem-solving approach may take some participants outside their comfort zone. Some of the ideas will come outside of work hours, while shopping, during dinner, or in the shower. Tell them: “Capture every idea immediately.”
Success tip: It’s rare to generate five sketches in one sitting. Knowing that the inspiration for your five ideas will come erratically, over a 24 hour period, plan your preparatory sketching accordingly.
Five Sketches™ teams succeed best when a manager tells the participants: “If you think you can’t get all five sketches done, come and see me before they’re due and I’ll help you reprioritize your work.” Early on, our Development Manager had to repeat this message to different teams of sketchers.
The facilitator has preparatory work, too: buying supplies and snacks, and preparing the room.
For each participant, make sure you have two fat-nib markers—one black and one red. Instead of black, blue or green will also work. Each participant also needs a pad of Post-it™ notes.
For the room, you’ll need a package of large paper, such as A3 or 11×17-inch, plenty of reusable adhesive putty, such as Blu-Tack™.
Quality snacks and drinks are a must, which you’ll make available in steps 4 and 6, below. Quality snacks include cheese and crackers, nuts, sliced vegetables with dip, and fresh or dried fruit. Avoid candy. Offices often lack serving bowls and a cheese board, so plan ahead.
Before each session, remove excess chairs from the room, so five people can easily walk around in it. Ensure the room’s central table is big enough for four people to sketch on. Clear the walls, because you’ll be posting dozens of sketches on them.
3. Share the sketches
During the four-hour session, each participant shares their sketches.
Do this in the room you prepared, as described above.
Before the sharing begins, ask everyone to add descriptive titles to their sketches and to label the actions in red, if needed. Those details are often missing. Also, to promote creativity, ask everyone to remove from the room devices that will interrupt them.
To warm up, ask the group: “Was your sticking point after two or three sketches?” Acknowledge that it’s difficult to generate five ideas—especially the first time. Ask: “Who thinks that once you reached five, you had sketched every possible solution?“
Success tip: If a participant didn’t bring five sketches, ask them to step out and finish sketching right then, while everyone else waits. If they can’t produce their five sketches quickly, cancel and reschedule the session. Experience tells us this: if you accept fewer sketches from one person, at the next session more people will bring too few sketches.
Present it. Get each participant to present one sketch. After each has had a turn, present their second sketches, and so on. Ask them to stand, hold up the sketch for all to see, and briefly explain it in positive terms. This takes only a few seconds, because each sketch will speak for itself. Discourage remarks that devalue the sketch or that are critical, such as “This isn’t a very good idea” or “We’ve already seen this idea.”
Limit the questions. If participants are genuinely confused about a sketch, let them ask for clarification. But always interrupt when participants start questioning details (“Is it A or is it B?”) and ask them to accept both A and B, because at this stage the goal is to identify many ideas without favouring any idea.

Post it. After presenting it, post it on the same wall as the other ideas—but don’t try to group the sketches. To post the sketches, use an adhesive putty such as Blu-Tack™. Don’t use tape, because tape interferes with the photocopier’s feeders or scanners you may use in step 8.
Welcome it. As each idea gets posted on the wall, everyone else in the room thanks the sketcher: “Thank you for that idea.” Everyone says this together—like a ritual—for several reasons:
- To acknowledge that it takes courage to stand and present an idea.
- To remind themselves not to analyse or critique the idea.
- To be welcoming of all ideas.
Success tip: Participants will want to engage with many of the sketches, but this isn’t the time for it. Tell them: “If you react strongly to someone’s sketch, quietly write a quick note to yourself about it—so you know your thought will be retained—and then mentally let go of it for now. Focus on the next presenter’s sketch.” The time to engage these thoughts is later, in step 5.
Initially, you’ll find resistance to the ritual phrase, but it is important to the success of this activity. If you’re having doubts, read Five Sketches ™ is informed by psychology.
Once all sketches are presented, ask: “Who saw good ideas on the wall that weren’t your own?” This helps the group see that there are more than the five ideas they brought. And they’re about to have even more ideas.

4. Mash up the sketches
Unlike the homework sketches, which are done separately, further sketching takes place during the session. As facilitator:
- Ask each person to “Start with another’s sketch, add something borrowed from your own sketching, and add something new that’s not yet on the wall.”
- As sketching begins, set out quality snacks. You want to reward the participants for sketching, and feed their brains. This might seem petty, but it promotes cooperation and increases participation.
- Next, ask each person to “Start with your own sketch, add something borrowed from another’s sketch, and add something new that’s not yet on the wall.”
As before, take turns presenting one sketch. There are two additions, though:
- Have each participant point out the starting sketch, the borrowed detail, and the new detail.
- Post this round of sketches on a different wall.

Remember to have everyone say: “Thank you for that idea,” for the same reasons as before. Repeatedly point out that each idea has been enhanced by combining details from different people’s sketches. Also point out that the group is still identifying new ideas—beyond each person’s original five sketches.
Mash-up sketches don’t just generate more ideas. They also diffuse ownership of the design that the team will eventually choose, by ensuring that some of everyone’s ideas have been incorporated. Mash-ups reinforce collaboration. Iterating and combining their ideas makes the team more receptive to changes later. Those changes be in response to project sponsors, stakeholders, QA testers, usability researchers, Beta-test users, and customers or users.
Success tip: During the mash-up sketching, it’s not unheard of for a developer to proclaim: “Why are we doing this?! The solution is already on the wall!” When this occurs, as facilitator, underscore the reason: “We want to saturate our brains with many choice ideas. The best ideas are often combinations of, or based on, earlier ideas, which is why we mash them up and iterate them.”
Up until now, it’s been all about generating ideas without critiquing them. After the mash-ups are presented, the team finally gets permission to start analysing, but in a constrained way.

5. “This idea may/not succeed because …”
During the analysis phase, keep it impersonal. Nobody should feel attacked for their ideas. To do this, as facilitator, constrain the group to one piece of feedback about each sketch before asking for a second piece of feedback about each sketch, and a third, and so on, until there’s no more to say.
Establish this one-at-a-time pattern while first soliciting comments about the likely strong points in each sketched idea. Here’s how:
- Place your hand on one sketch, and ask for one comment that begins with the structured phrase—like a ritual: “This idea may succeed because….” The one comment can come from anyone who sketched.
- Write the comment on a yellow sticky note and post it near or on the sketch.

- Move your hand to the next sketch, and ask for one comment that begins with the structured phrase—like a ritual: “This idea may succeed because….”
- Continue this way, gathering one comment for every sketch. After every sketch has one, gather a second comment for every sketch, and a third, and so on, until there are no more comments about likely strong points.
Sometimes the same feedback applies to almost every sketch. If so, add the same sticky note to each sketch.
Initially, you’ll find resistance to the ritual phrases and actions, but it is important to the success of this task. If you’re having doubts, read Five Sketches™ is informed by psychology. Help participants to use the structured phrase by saying it with them: “This idea may not succeed because….”
Success tip: Never accept more than one comment in succession about the same sketch, because people will stop listening and start defending their sketches.
With the ritual of the structured phrase well established, after all likely strong points are gathered, repeat the whole process for likely weak points in each sketched idea. This time:
- Place your hand on one sketch, and ask for one comment that begins with the structured phrase: “This idea may not succeed because….” This one comment can come from anyone who sketched.
- Write the comment on a second colour of sticky note and post it near or on the sketch.
- Move your hand to the next sketch, and ask for one comment that begins with the structured phrase—like a ritual: “This idea may not succeed because….”
- Continue this way, gathering one comment for every sketch. After every sketch has one, gather a second comment for every sketch, and a third, and so on, until there are no more comments about likely weak points.
Sometimes the same feedback applies to almost every sketch. If so, add the same sticky note to each sketch.
Occasionally, you’ll observe that the “may not succeed” round prompted debate, or it was ego-bruising for some participants. Always shut down the debate, and instead, after all “May not succeed” comments are gathered, do a third round, asking: “This idea may succeed because….” This allows people to identify additional strong points that counter a weak point—without it becoming a debate.
Success tip: Never blend the likely-strengths and likely-weaknesses into one round. To avoid the feeling that one participant is being persecuted, every sketch must be seen to get criticism only when others are also getting it, and praise only when others are also getting it.
This process lets people analyse and judge the sketches while keeping it relatively impersonal.

6. The pretty good solution
Next, it’s time to respond to the analysis. Ask the participants to “sketch a pretty good solution”—any sketch posted on any wall, and any new ideas that they feel are needed. Ask participants to resolve the may-not-succeed details and retain the may-succeed details.
As before, provide quality snacks while people sketch.
Success tip: Although you’ve asked for a “pretty good solution,” this round of sketches will likely surpass that standard. However, setting the bar at perfection is an idea blocker—so don’t stifle the process by asking for excellence. Instead, give the participants room to over-deliver.
As before, participants take turns presenting their sketch. Each person will have only one sketch to present, this time. Post these sketches on a wall that’s separate from all other sketches. These sketches may be your outcome.
7. Possible outcomes
At this stage, as facilitator, you’ll be able to identify one of these.
Outcome One. Most likely everyone has sketched the same idea, or parts of the same idea that fit together. Point out how they fit together, and then capture the common understanding, as described in step 8.
Outcome Two. There are two competing ideas. There are two ways to move forward. If you think it would break the impasse, do another round of mash-up sketching—and strongly encourage the team to borrow something from the competing idea and to add something new. If the two ideas won’t budge, quickly try to “measure” which idea is better, and then immediately sketch again—again borrowing something and adding something new. Do this before you continue with step 8.
Outcome Three. You realize that there’s a dependency on another piece that needs to be designed. No problem! Pause the current session and instead tackle the dependent piece by completing its step 1 immediately, and then continuing the dependent piece with steps 2 through 8 the next day, using the session that you already booked. Meanwhile, move all the current sketches to a side wall to make room for the dependent piece. After the dependent piece is resolved, you can turn back to the side wall, and watch the pieces of the paused session fall into place rapidly. We’ve seen cases where there were three (!) consecutive dependencies, but once the last dependency was designed, all the earlier solutions fell into place in under an hour.
Success tip: Outcome Three is a good result. Once you remove the blocking problem, it can quickly become Outcome One.
Outcome Four. The problem statement was wrong, too vague, or too large in scope. No problem! No software was written, no prototype was built, so the cost of discovering that you were trying to solve the wrong problem is minimal. Start again at step 1, to tune the problem statement, and then send everyone away to sketch five ideas for the next session—which you have already booked. Move all the current sketches to a side wall—and keep them on the wall as potential ideas to borrow from later.
8. Capture the common understanding
If you reached Outcome One or worked through Outcome Two, as described above, then at the end of the four-hour session, appoint one person to write numbered steps—like instructions for a user—that an outsider could use to walk through the successful idea. This becomes a written sketch. Insert scanned or photographed images of the results of Outcome One or Outcome Two in the written sketch. Crop or trim the images to show only the detail relevant to each numbered step. (Microsoft Word and Google Docs do this well; cropping images may be easier in Word.) As facilitator, don’t do this work yourself; let the participants own the production of this written sketch. Do review and edit the written sketch before the next session.
Success tips:
☼ Use a phone app to turn sketches into a rectangular, well-lit digital image.
☼ Photocopier-scanners also make digital images, and can email them or save them onto a USB memory stick.
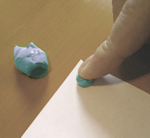
☼ To remove stubborn putty from paper, use a loose lump of putty.
On large design projects that have multiple problem statements in succession, at the start of the next four-hour session, take 10 to 15 minutes to review the preceding session’s written sketch. Doing this at the start of the next session sets the context for further designs. If there are no more sessions, call a 15-minute meeting to review the written sketch with the team.
The participant who prepared it will have made some assumptions, so expect to clarify and add details in parts of the written sketch. Thank them for their effort in making sense of the sketches theyw ere left with. If revisions are needed, again assign this to a participant to do afterwards.
For tax purposes, scan and save all rounds of the day’s sketches—not just the “Outcome One” sketches. In some tax jurisdictions, the dozens of additional “unused” sketches may be evidence of research and design, if tax auditors require evidence. That’s because a direct path to success is not considered research, whereas trying different ideas as a form of risk-taking—by documenting your “failures” in the form of abandoned sketches—may help demonstrate that R&D took place.
9. Share the outcome with your project sponsor, stakeholders, and user researchers
Walk the project sponsor through the sketches from Outcome One or Outcome Two. (Don’t share the written sketch at this point—it’s got too much detail.) If need be, hand the sponsor paper and pens, and have them sketch any additional requirements. After they leave, adapt the design to incorporate the new requirements into the written sketch from step 8. If the team finds the changes to be extensive or controversial, schedule a four-hour session and start again from step 1.
After the project sponsor and stakeholders have approved the sketches you shared, and the written sketch is updated, then share the written sketch with the wider team, including the:
- project sponsor or product manager, to formally deliver the design. They can use it to develop and communicate their product strategy, and to manage stakeholders.
- usability analyst or user researcher, to quickly validate the design with the target audience, or users, for example by testing paper prototypes.
- development manager, to help plan the design’s implementation.
- business analyst, to help write Agile stories or technical specifications.
- developers, to provide context for coding and context for unit testing.
- quality assurance, to help them compare the Agile stories or specs to the design, and to plan QA acceptance testing.

10. Conduct a process retrospective
Shortly after the Five Sketches™ process completes, schedule a meeting for all participants. Ask them to prepare by bringing their Keep-Stop-Start list for fine-tuning the process to your team’s environment. Next time:
- Keep doing … the things that worked. What was essential?
- Stop doing … the things that didn’t work. What could you do without? What was a hindrance?
- Start doing … the things that were missing. What got skipped?
Discuss the combined Keep-Stop-Start lists. Share the recommendations with the team and with colleagues who are considering the Five Sketches™ method for producing quality software designs, quickly.
The benefits of sketching
Guess what? Five Sketches™ isn’t the only method that’s been developed to solve software-design problems. Have a look at the Design Studio method, or read Bill Buxton’s book, Sketching User Experiences. You’ll notice that they share key elements: sketching, working quickly, generating many ideas before narrowing the focus to one idea. Different groups have come to the same conclusion: sketching works.
That said, Five Sketches™ doesn’t benefit every project. Sometimes a problem needs a cookie-cutter solution—one that everyone can already see, or one that complies with a standard.
But in many cases, Five Sketches™ is right, because it:
- Produces quality designs, quickly. By considering many ideas and sketching their way through the choices, your team quickly develops good designs that are clearly understood and that can be built.
- Brings new skills. Involvement in design work improves the creativity “fitness” levels of non-designers, and can help change your corporate culture. Participants realize the benefit of generating ideas, and mashing up ideas—welcoming input from others rather than defending their one prize idea—to generate better designs, quickly. This also makes it easier, a bit later in the development cycle, to recognize the need for changes once your usability researchers start to discover user feedback.
- Engages employees. Involvement in design is a professional stretch that has a rewarding outcome. Participants make a valuable contribution to the product. Participants feel product ownership. And the collaboration contributes to team building.
- Saves time and money. Design reduces risk. Technical and usability issues arise during the design and discussion stage, not after coding. And the solutions are more creative.
- Influences future designs. More team members will have background knowledge of previous design decisions, because they participated in previous Five Sketches™ sessions. In large product suites, more team members will learn about other parts of the product. And you’ll get greater consistency.
Contents
- Review a specific step: 1 | 2 | 3 | 4 | 5 | 6 | 7 | 8 | 9 | 10.
- Why 5 sketches? Why not 3? It’s not just about the total number. There are individual benefits to sketching that also benefit the organisation.
- Set the problem statement just right. Before you start sketching, ensure you’re solving the right problem.
- How to sketch to share design ideas. This includes a ten-minute group exercise to learn how to communicate through sketches.
- Competing ideas at the finish line? Here’s how to pick a winner, by helping the team to make a decision that satisfies all participants.
- Five Sketches™ is informed by psychology to make it an effective, efficient, conflict-free method for non-designers who need to generate a good design solution.